Can Print Lift recover original artwork from a garment photo?
Print Lift can create a cleaner flat-artwork reference from a garment photo, but it should be reviewed and often redrawn, cleaned, vectorized, or rebuilt before production use.

Guide page
Finished garments often contain useful artwork that is locked inside a photo: chest prints, sleeve graphics, labels, sponsor marks, typography, badges, or all-over patterns. The problem is that garment photos include folds, shadows, camera angle, fabric texture, compression, and perspective distortion, so the image rarely works as a print file by itself. Current print-file guidance from providers such as Printful and Printify still emphasizes resolution, file format, transparency, and product-specific print requirements, while Adobe documents Image Trace as a way to convert raster images into editable vector artwork. Ayzelify Print Lift sits before that final production stage: it helps designers, print shops, and exporters recover a cleaner flat-artwork reference from a garment photo so the file can be reviewed, redrawn, vectorized, or rebuilt correctly.
A Print Lift workflow turns a garment photo into a cleaner flat artwork reference by selecting the graphic area, reducing garment distortion, checking the lifted result against the source photo, and handing it to a designer or print operator for redraw, vectorization, print-file preparation, and buyer approval.
Garment photos are often the only available reference when a team needs to recreate a chest print, typography layout, sleeve mark, logo badge, or all-over placement graphic.
The source image usually contains distortion from folds, shadows, fabric texture, camera angle, compression, and curved garment surfaces, so the lifted result must be reviewed instead of treated as an automatic print file.
Ayzelify Print Lift helps isolate artwork areas and create flatter references that designers, print operators, and exporters can use for redraw, cleanup, vectorization, or production discussion.
A strong workflow separates three stages: extraction reference, design cleanup, and print-file approval. Mixing those stages creates weak files and avoidable sampling mistakes.
Before commercial use, teams still need to confirm artwork ownership, buyer permission, resolution, color expectations, print method, scale, edges, typography, and product-specific production requirements.
The source photo controls the quality of the recovered artwork reference. A straight-on, well-lit image with visible print edges gives Print Lift better information than a folded, shadowed, blurry, or angled product photo.
For chest graphics, sleeve marks, badges, and typography, ask for a second photo if the first one hides edges or warps the design. One extra reference photo can save time later in redraw and print review.
This matters because the lifted output is only as trustworthy as the visual evidence inside the source image. Bad folds, harsh shadows, and compression artifacts can become false edges or missing details.
A chest print, sleeve print, logo, text layout, seamless pattern, and full sublimation design each need a different review mindset. Treating every garment photo as one generic extraction can blur the exact problem the designer needs to solve.
Print Lift presets help focus the tool on the useful area. Text and typography need letter-shape checking. Logo-only work needs edge and proportion checking. All-over artwork needs repeat, scale, and seam-placement discussion.
The goal is not to guess the final file format too early. The goal is to create a clean reference that tells the designer or print operator what must be rebuilt.
A useful Print Lift workflow includes comparison, not just generation. Place the lifted artwork beside the garment photo and look for missing letters, broken outlines, warped badges, color shifts, and details that disappeared in folds or shadows.
This review step turns the output into a practical design reference. Without it, the team may send a flawed file into redraw, quotation, sampling, or buyer approval.
For exporters and factories, the comparison can also become part of the communication trail: source photo, lifted reference, cleanup notes, and buyer approval status.
Some lifted artwork can be cleaned as raster artwork, especially if the final process accepts a transparent PNG at the correct size and resolution. Other artwork needs manual redraw or vectorization because logos, text, badges, and line art need crisp scalable paths.
Adobe documents Image Trace as a way to convert raster images into editable vector artwork, but tracing is still a review step. A traced logo can contain too many points, uneven curves, rough letter edges, or lost negative space if the source reference is weak.
Ayzelify works best when Print Lift and Vectorize are treated as linked stages: lift the reference from the garment, inspect it, then vectorize or redraw only when the artwork type and production method require it.
Print providers and print shops usually care about practical file requirements: resolution, dimensions, transparent background, print area, file format, gradients, fabric color, color expectations, and the chosen method. DTG, DTF, screen print, embroidery, and sublimation do not all behave the same way.
That is why Print Lift should not be sold internally as a magic production button. It is a recovery and review tool. The final approved file still needs the normal print-prep checks before money is spent on sampling or bulk production.
For repeat work, save the final artwork, source image, lifted reference, approval notes, and print method with the product record. The real win is not only recovering one graphic; it is preventing that artwork from being lost again.
Ayzelify Print Lift helps designers, print shops, and exporters isolate garment graphics, clean the reference, compare the result, and prepare reviewable artwork direction when the original file is missing.
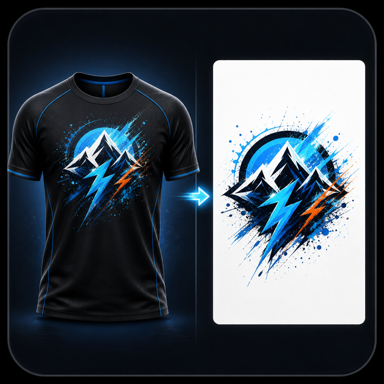
Print Lift can create a cleaner flat-artwork reference from a garment photo, but it should be reviewed and often redrawn, cleaned, vectorized, or rebuilt before production use.
Straight-on, well-lit, high-resolution photos with low wrinkle distortion, visible edges, and minimal shadows usually produce stronger artwork references than angled or blurry photos.
Treat it as a reviewable reference unless your team has checked resolution, transparent background, scale, edges, colors, typography, print method, and product-specific production requirements.
Vectorize or redraw the artwork when it needs clean paths for logos, text, line art, embroidery, cutting, screen print, or large-format scaling.
Use Ayzelify to generate product visuals, ecommerce content, and buyer-ready assets, then review every output before publishing.